by Micha Oates
However, on closer inspection, I quickly realised that this seemingly juvenile contraption was in fact a Lomography analogue camera – the curiously named Diana-F Mini.
 |
| Diana-F Mini (source:cldfx.com) |
Although Lomography’s mantra struck me as being unashamedly “hipster” and pretentious, I was keen to try my hand at analogue photography. So, holding this brazenly trendy camera in my hands, I set about trying to work out how to use it. However, as a “child of the digital age”, this posed a greater challenge to me than originally expected...
Challenge No.1: Turning the camera on.
“Simple”, you might say. But, after searching endlessly for the on/off button, it took a frustrated phone call with my brother for me to discover that an analogue camera does need to be “turned on” in the same way that a modern digital camera does; that is, an analogue camera is mechanical, and does not require a power source to work. I found this news hard to grasp, but once I had got past the distinct lack of batteries, I began to appreciate the simplicity of the design.
Challenge No.2: Choosing (and then loading) the film.
Challenge No. 4: Taking photographs.
Armed with my new knowledge of analogue photography, I stepped outside and began to click the shutter. I felt as though I had returned to the past – who needs batteries and cables and memory cards when you have a decent roll of film and good lighting conditions? I imagined myself working alongside the revolutionary fashion photographers of the 1960s, turning to them casually and discussing the best aperture to use, before going for coffee in the nearest bohemian haunt. With my camera in hand and an ironic vintage bowler hat on my head, I captured my first roll of film. 
Now, I had to wait. Film processing is a lengthy and technical job, requiring a knowledgeable and steady hand, but eventually the developed prints arrived through my letter box.
Nervously tearing open the envelope, I didn’t know what to expect. Had I managed to capture of roll of soon-to-be iconic images? Had I wasted a roll of expensive film? I scrutinised the prints.
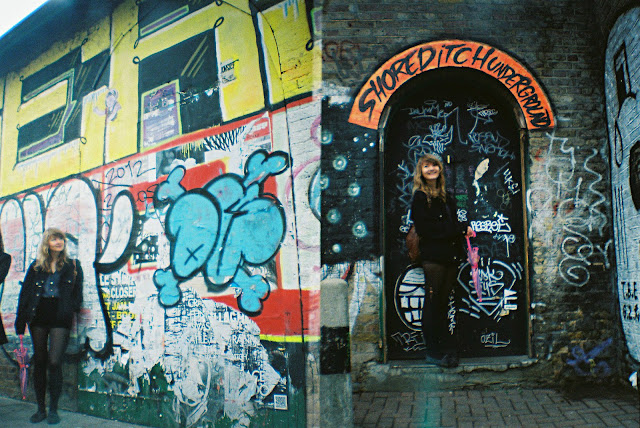
They were unlike anything I had ever seen before – rectangles of highly saturated colours, with bizarre overlapped images and winding streaks of coloured light. To the professional photographer, they were pretty poor images with careless compositions and unsteady focus. But to me, they were fantastically weird.
After the success of my first prints, I was sure that my next set of photographs would be just as good, if not better, than my first attempt. However, analogue photography is a risky game and it is not uncommon to have a bad set of prints. Indeed, my second roll of film was terrible (very shaky and over-exposed), but the trick is to keep experimenting. Even if you only get one good photo from a roll of film, keep trying and you will be constantly surprised by the varying standards and styles of your Lomography photographs. Plus, you’ll have more to look forward to in the post than just your annual birthday cards and monthly bank statements...
Challenge No. 5: “Don’t get cocky” - Keeping up the standard of photography.
After the success of my first prints, I was sure that my next set of photographs would be just as good, if not better, than my first attempt. However, analogue photography is a risky game and it is not uncommon to have a bad set of prints. Indeed, my second roll of film was terrible (very shaky and over-exposed), but the trick is to keep experimenting. Even if you only get one good photo from a roll of film, keep trying and you will be constantly surprised by the varying standards and styles of your Lomography photographs. Plus, you’ll have more to look forward to in the post than just your annual birthday cards and monthly bank statements...
%5B1%5D.JPG)

%5B1%5D.JPG)


Were the artificial colours in some of the pictures created along with the photo, through filters or special film, or were they added in "post processing"?
ReplyDeleteWould you be available to take my wedding photos? With a pink filter (if you please)? I am willing to pay substantial fees.
ReplyDeleteWith coloured flash filters :)
ReplyDeleteI also received a lomography camera for my birthday, though it was a fisheye. I am saving for the diana mini because it has more variety when deciding what to shoot!
ReplyDeleteJust bought a Diana Mini because of this article. Looking forward to using it!
ReplyDelete